

Have you been enjoying my recent content on the Power Platform CLI (command line interface), and like these cool new ways to speed up operations for when working with the Power Platform? 🚀
I’ve got another one for you in today’s post where we’re going to talk about something less admin related but how you can move solutions between environments without having to go through the tedious tasks of opening up make.powerapps.com, selecting the right environment, exporting and downloading solutions, importing them and publishing customisations all with longer time taking button clicks! We’re going to replace this lengthy process with some quick simple commands in the CLI saving us a bunch of time for simple non-automated deployments.
pac auth
First we need to ensure we have authenticated properly to Power Platform from the CLI. There’s a number of things we can do here. First we can use pac auth list to list the auth profiles we have already created and that we can select from.

Then if there is an auth profile with a token that hasn’t expired, we can use the following command to select and use that auth profile and work with that environment.
pac auth select --index 1Replace 1 with the index number of the auth profile you want to use.
pac org
Next we will need to select the environment that we want to work with to export a solution from. To do this we will need to list our environments first to identify their names to then select the correct one. Start by running the following command to list environments.
pac org list
Unlike auth profiles, our environments will not have an index number that we can easily use to select them with. Instead we have to use their names and the –environment parameter to select them.
Once you have your list of environments you can then use the following command to select the one you want to work with.
pac org select --environment EnvironmentNameReplace EnvironmentName with the name of the environment you’d like to work with.
You may need to use the unique name of the environment if you have multiple environments with similar display names.

pac solution
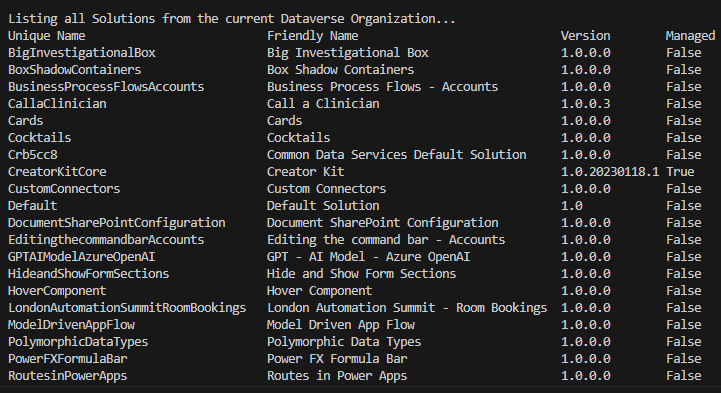
Before we handle a solution export, lets take a look at our solutions in the environment we’ve selected to work with using the following command.
pac solution listThis will list all of the solutions from the currently selected Dataverse organisation / environment.
Now we can work on looking at the command to use for solution exports. For this we will use the following command.
pac solution export --path c:\Users\Documents\Solution.zip --name MySolution --managed true Here you can see there are a number of parameters I have used for the export. The first two are required.
–path
With this parameter we need to specify a path on our local machine that we can save our export to.
–name
Using this parameter we will specify the internal name of the solution that we want to export and download.
–managed
Using this true/false switch parameter we will determine whether the solution we export should be managed or not.
So we can use pac solution export and the above parameters to export our solution.

Now we can work on importing our solution to our target environment. To do this we will need to at least switch org’s i.e. the environment we are currently selected on. You may also want to switch auth profiles if you are importing to an environment in a different tenant.
Use pac org list and pac org select to switch environments.
If you need to switch auth profiles i.e. tenants, use pac auth list and pac auth select or even pac auth create if you haven’t got an auth profile setup for the tenant you are trying to work with.
If you did switch tenants, use pac org list and pac org select afterwards to select the environment to work with following selecting the new tenant.
Now we can use the following command to import our solution.
pac solution import --path YourPathUsing the command above we can import our exported solution into our now selected Dataverse environment. Replace ‘YourPath’ with the path you used to export your solution to. Remember to add the file name on to the end of the path this time to import the file rather than trying to import its parent directory which will not work 🙂

Upcoming content
So, we’ve now covered a few different areas of the Power Platform CLI including some admin areas and solution imports and exports. We’ll continue to look at the Power Platform CLI in my upcoming posts before moving onto other areas of the Power Platform Developer Tools such as the ALM developer tools, Dataverse developer tools and more!
Make sure you’re subscribed to my blog to get all of this upcoming content directly in your inbox on a daily basis! Don’t miss this! 📩
Subscribe