

Recently I came across a requirement I had for working with live chat in Omnichannel for Customer Service whereby I had to make a very small adjustment to the functionality of the live chat widget you can use to interact with Omnichannel through the live chat communications channel.
In this blog post, I’ll show you how to develop a custom chat widget for Dynamics 365 Omnichannel for Customer Service using the Omnichannel chat SDK and React UI components provided by Microsoft for the live chat widget, so you can make the functionality enhancements that you need for your customers! 💖
A functional requirement
Effectively I had a requirement to be able to have multiple chat widget’s running (customer perspective) in a single browser session without the chat syncing between all of them.
There is an amount of customisability we can apply to the live chat widget provided out the box using the data-customization-callback which allows us to set values for various properties in the chat widget. The problem here is that we can only use this for visual and UI adjustments by injecting CSS using a function which we pass to the data-customization-callback.
If you’re only trying to make visual enhancements to the out the box live chat widget for Omnichannel, check out this post here to understand how to do this:
On the flip side, when it comes to functional changes we need to make to the live chat widget, we have to use the Omnichannel chat SDK, and the Omnichannel chat widget React UI component library to develop a custom chat widget. We will use a standard approach to this using these two things in this blog post so we replicate the functionality of the out the box chat widget but are easily able to make a change to the code and rebuild it if we want to later make enhancements.
Code editor
If you don’t already have a code editor, you’ll need to install one. I recommend Visual Studio Code which is my code editor of choice.
https://code.visualstudio.com/

Install node.js
To get started, if you haven’t previously done this, you’ll need to install node.js

Make sure you restart your device once you’ve installed these things before starting to code.
Let’s get coding!
So, lets start coding now. The rest of this article is based on the method and guidance from Microsoft here with a few additions to make this slightly more up to date…
Project folder
Start by creating a folder somewhere on your directory where we will store our code and built code. Open this folder in Visual Studio Code by dragging it to the app icon in your dock (MacOS) or right click it and select open in Visual Studio Code.
Source and output folders
Now within the explorer in Visual Studio Code, start by creating two folders as below.
| dist | Folder for the outputs of building our code. |
| src | Folder to contain source code that we will build. |
Folders to create
package.json
Add both of the above folders in the root of the project. Then also add package.json in the root of the project. Simply create a file called ‘package.json’ and add the following object.
{
    "name": "my-sample-widget",
    "version": "0.0.1"
}
index.html
Now we’re going to add the html file we’ll be able to run to see the chat widget working which will reference another file that gets created once we build our React app. Add this in the dist folder as it will be part of the outputs of our code.
<!DOCTYPE html>
<html>

<head>
    <meta charset="utf-8" />
</head>

<body>
    <div id="root"></div>
    <script src="bundle.js"></script>
</body>

</html>
Add React and TypeScript
Now we need to install a few packages using npm for React and TypeScript. Run the following three commands from the terminal from the root project folder.
npm install react react-domnpm install --save-dev typescriptnpm install --save-dev @types/react @types/react-domtsconfig.json
Now in the root of the project create a file called ‘tsconfig.json’ and add the following content.
{
    "compilerOptions": {
      "lib": ["dom", "dom.iterable", "esnext"],
      "allowJs": true,
      "allowSyntheticDefaultImports": true,
      "skipLibCheck": true,
      "esModuleInterop": true,
      "strict": true,
      "forceConsistentCasingInFileNames": true,
      "moduleResolution": "node",
      "resolveJsonModule": true,
      "isolatedModules": true,
      "noEmit": true,
      "jsx": "react"
    },
    "include": ["src"]
  }
Babel
Now run the following command to add Babel to the project.
npm install --save-dev @babel/core @babel/preset-env @babel/preset-react @babel/preset-typescript @babel/plugin-transform-runtime @babel/runtimeWe now need to configure babel by creating a file called ‘.babelrc’ in the root of the project again. Add the following content.
{
    "presets": [
      "@babel/preset-env",
      "@babel/preset-react",
      "@babel/preset-typescript"
    ],
    "plugins": [
      [
        "@babel/plugin-transform-runtime",
        {
          "regenerator": true
        }
      ]
    ]
  }
Webpack
Now we need to install some more packages including webpack and webpack command line tools to continue working. Run the following commands.
npm install --save-dev webpack webpack-cli @types/webpacknpm install --save-dev webpack-dev-server @types/webpack-dev-servernpm install --save-dev babel-loadernpm install --save-dev ts-nodenpm install crypto-browserifynpm install stream-browserifynpm install assertOnce you have installed the packages we need above, we’ll need to configure webpack in its own file in the root of the project. Create a file called ‘webpack.config.ts’ and add the following content.
import path from "path";
import { Configuration } from "webpack";
// eslint-disable-next-line @typescript-eslint/no-unused-vars
import * as webpackDevServer from "webpack-dev-server";

const disableFullyQualifiedNameResolutions = {
    test: /\.m?js/,
    resolve: {
        fullySpecified: false,
    },
};

const babelLoaderConfiguration = {
    test: /\.(ts|js)x?$/,
    exclude: /node_modules/,
    use: {
        loader: "babel-loader",
        options: {
            presets: [
                "@babel/preset-env",
                "@babel/preset-react",
                "@babel/preset-typescript",
            ],
        },
    }
};

const config: Configuration = {
    entry: "./src/index.tsx",
    mode: "development",
    module: {
        rules: [
            babelLoaderConfiguration,
            disableFullyQualifiedNameResolutions
        ],
    },
    resolve: {
        extensions: [".tsx", ".ts", ".js"],
        fallback: {
            assert: require.resolve("assert"),
            crypto: require.resolve("crypto-browserify"),
            stream: require.resolve("stream-browserify")
        },
    },
    output: {
        path: path.resolve(__dirname, "dist"),
        filename: "bundle.js",
    },
    devServer: {
        static: path.join(__dirname, "dist"),
        compress: true,
        port: 4000,
        open: "chrome",
        client: {
            overlay: {
                warnings: false,
                errors: true
            }
        }
    },
    externals: {
        "react-native": true
    }
};

export default config;
Install Omnichannel Live Chat Widget UI Components
Next lets install the Omnichannel LCW UI Components using the following two commands. We’re also installing the chat SDK here.
npm i @microsoft/omnichannel-chat-sdknpm i @microsoft/omnichannel-chat-widget --legacy-peer-depsInstall the following required packages
Install these following dependent packages.
npm install rxjs@5.5.12npm install react-nativeAdd the <LiveChatWidget /> component to index.tsx
Next we’ll create an index.tsx folder in the src folder in our project which is almost the file that stores the code that says “this is the chat widget I want to create and build when I run the build commands, pull from this file”.
Add the following content for a standard chat widget. Make sure you replace the orgId, orgUrl, and widgetId.
import { OmnichannelChatSDK } from "@microsoft/omnichannel-chat-sdk";
import { LiveChatWidget } from "@microsoft/omnichannel-chat-widget";
import React, { useEffect, useState } from "react";
import ReactDOM from "react-dom";

const getOmnichannelChatConfig = () => {
    // add your own OC setting, hard-coded just for sample, should be replaced with a better handling
    const omnichannelConfig = {
        orgId: "",
        orgUrl: "",
        widgetId: ""
    };
    return omnichannelConfig;
}

const App = () => {
    const [liveChatWidgetProps, setLiveChatWidgetProps] = useState<any>();

    useEffect(() => {
        const init = async () => {
            const omnichannelConfig = getOmnichannelChatConfig();

            const chatSDK = new OmnichannelChatSDK(omnichannelConfig);
            await chatSDK.initialize();
            const chatConfig = await chatSDK.getLiveChatConfig();

            const liveChatWidgetProps = {
                styleProps: {
                    generalStyles: {
                        width: "400px",
                        height: "600px",
                        bottom: "30px",
                        right: "30px"
                    }
                },
                chatSDK,
                chatConfig,
                webChatContainerProps:{
                    disableMarkdownMessageFormatting : true, //setting the default to true for a known issue with markdown
                }
            };

            setLiveChatWidgetProps(liveChatWidgetProps);
        }

        init();
    }, []);

    return (
        <div>
            {liveChatWidgetProps && <LiveChatWidget {...liveChatWidgetProps} />}
        </div>
    );
};

ReactDOM.render(
    <App />,
    document.getElementById("root")
);
Add scripts to package.json for building and running the code
To be able to build and run the code, add the following scripts object to the package.json object as a nested object.
    "scripts": {
        "start": "webpack serve --open",
        "build": "webpack --mode development"
      }
Build and run the code
Now to build the code run…
npm run buildTo launch the chat widget in your browser to test out the code run…
npm run startSuccessfully built code
If your code build was successful, when you run npm run start you’ll see the following
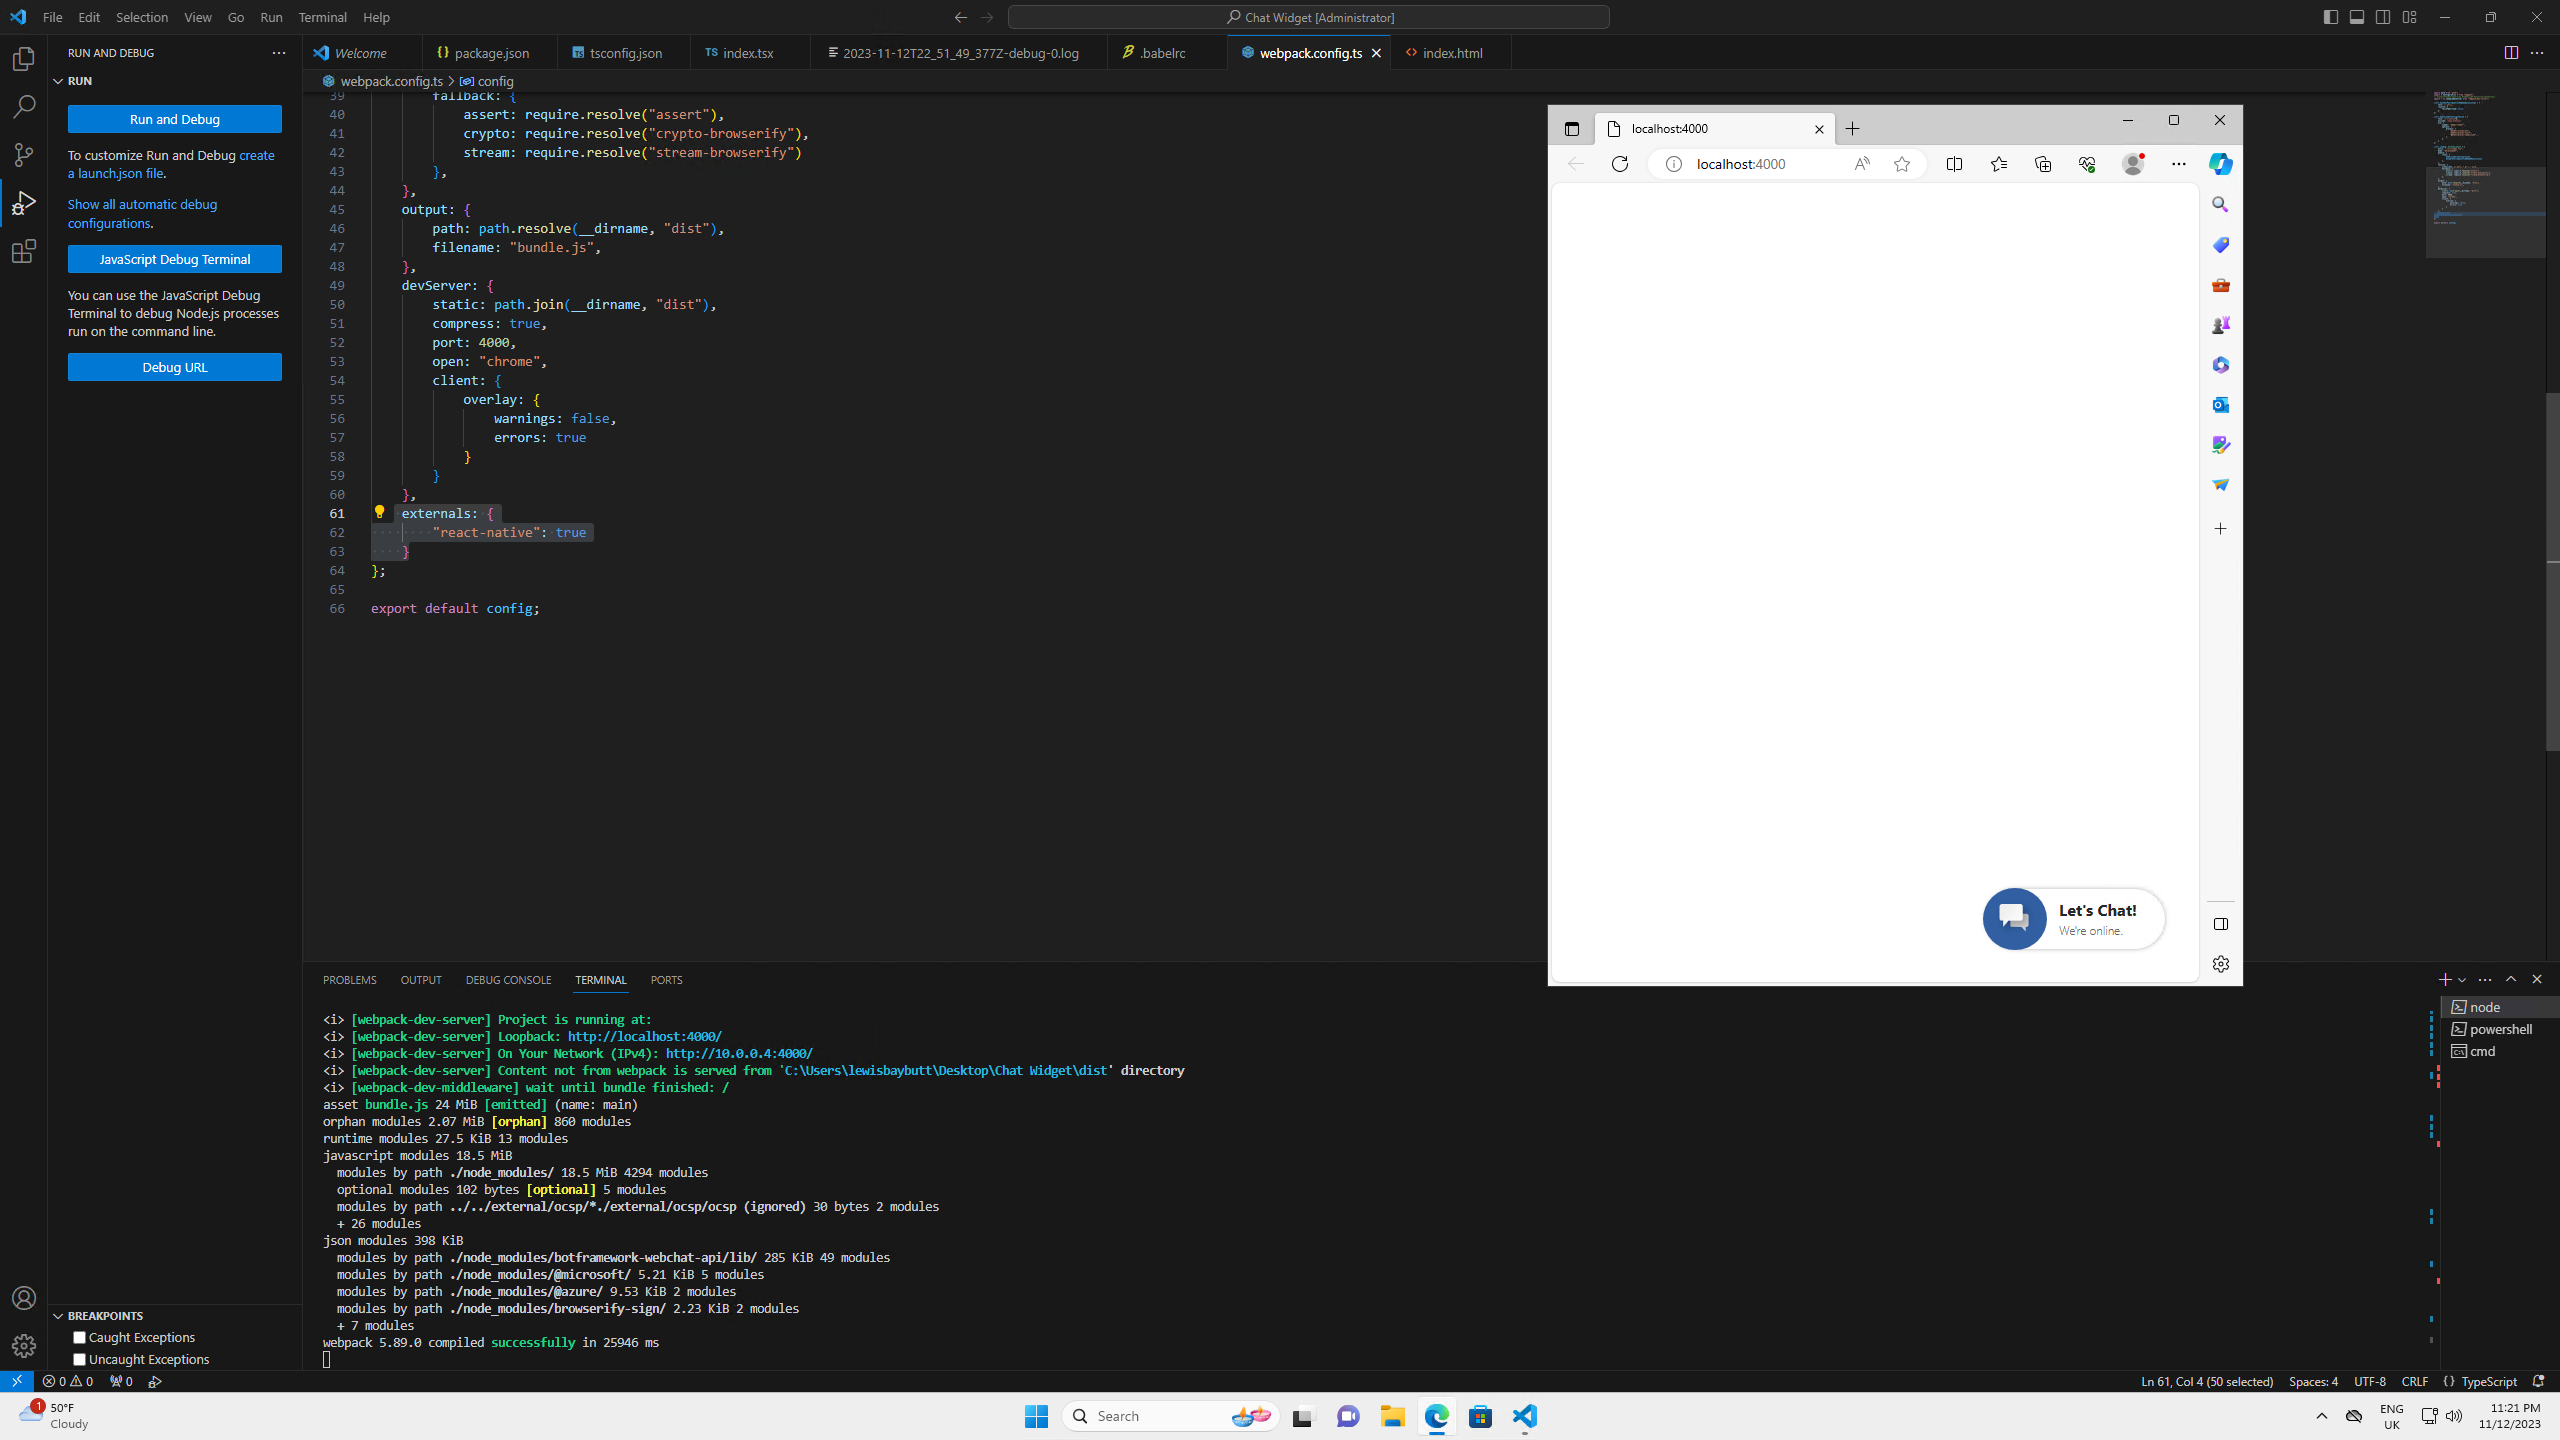
Awesome, we have a chat widget!
Changes
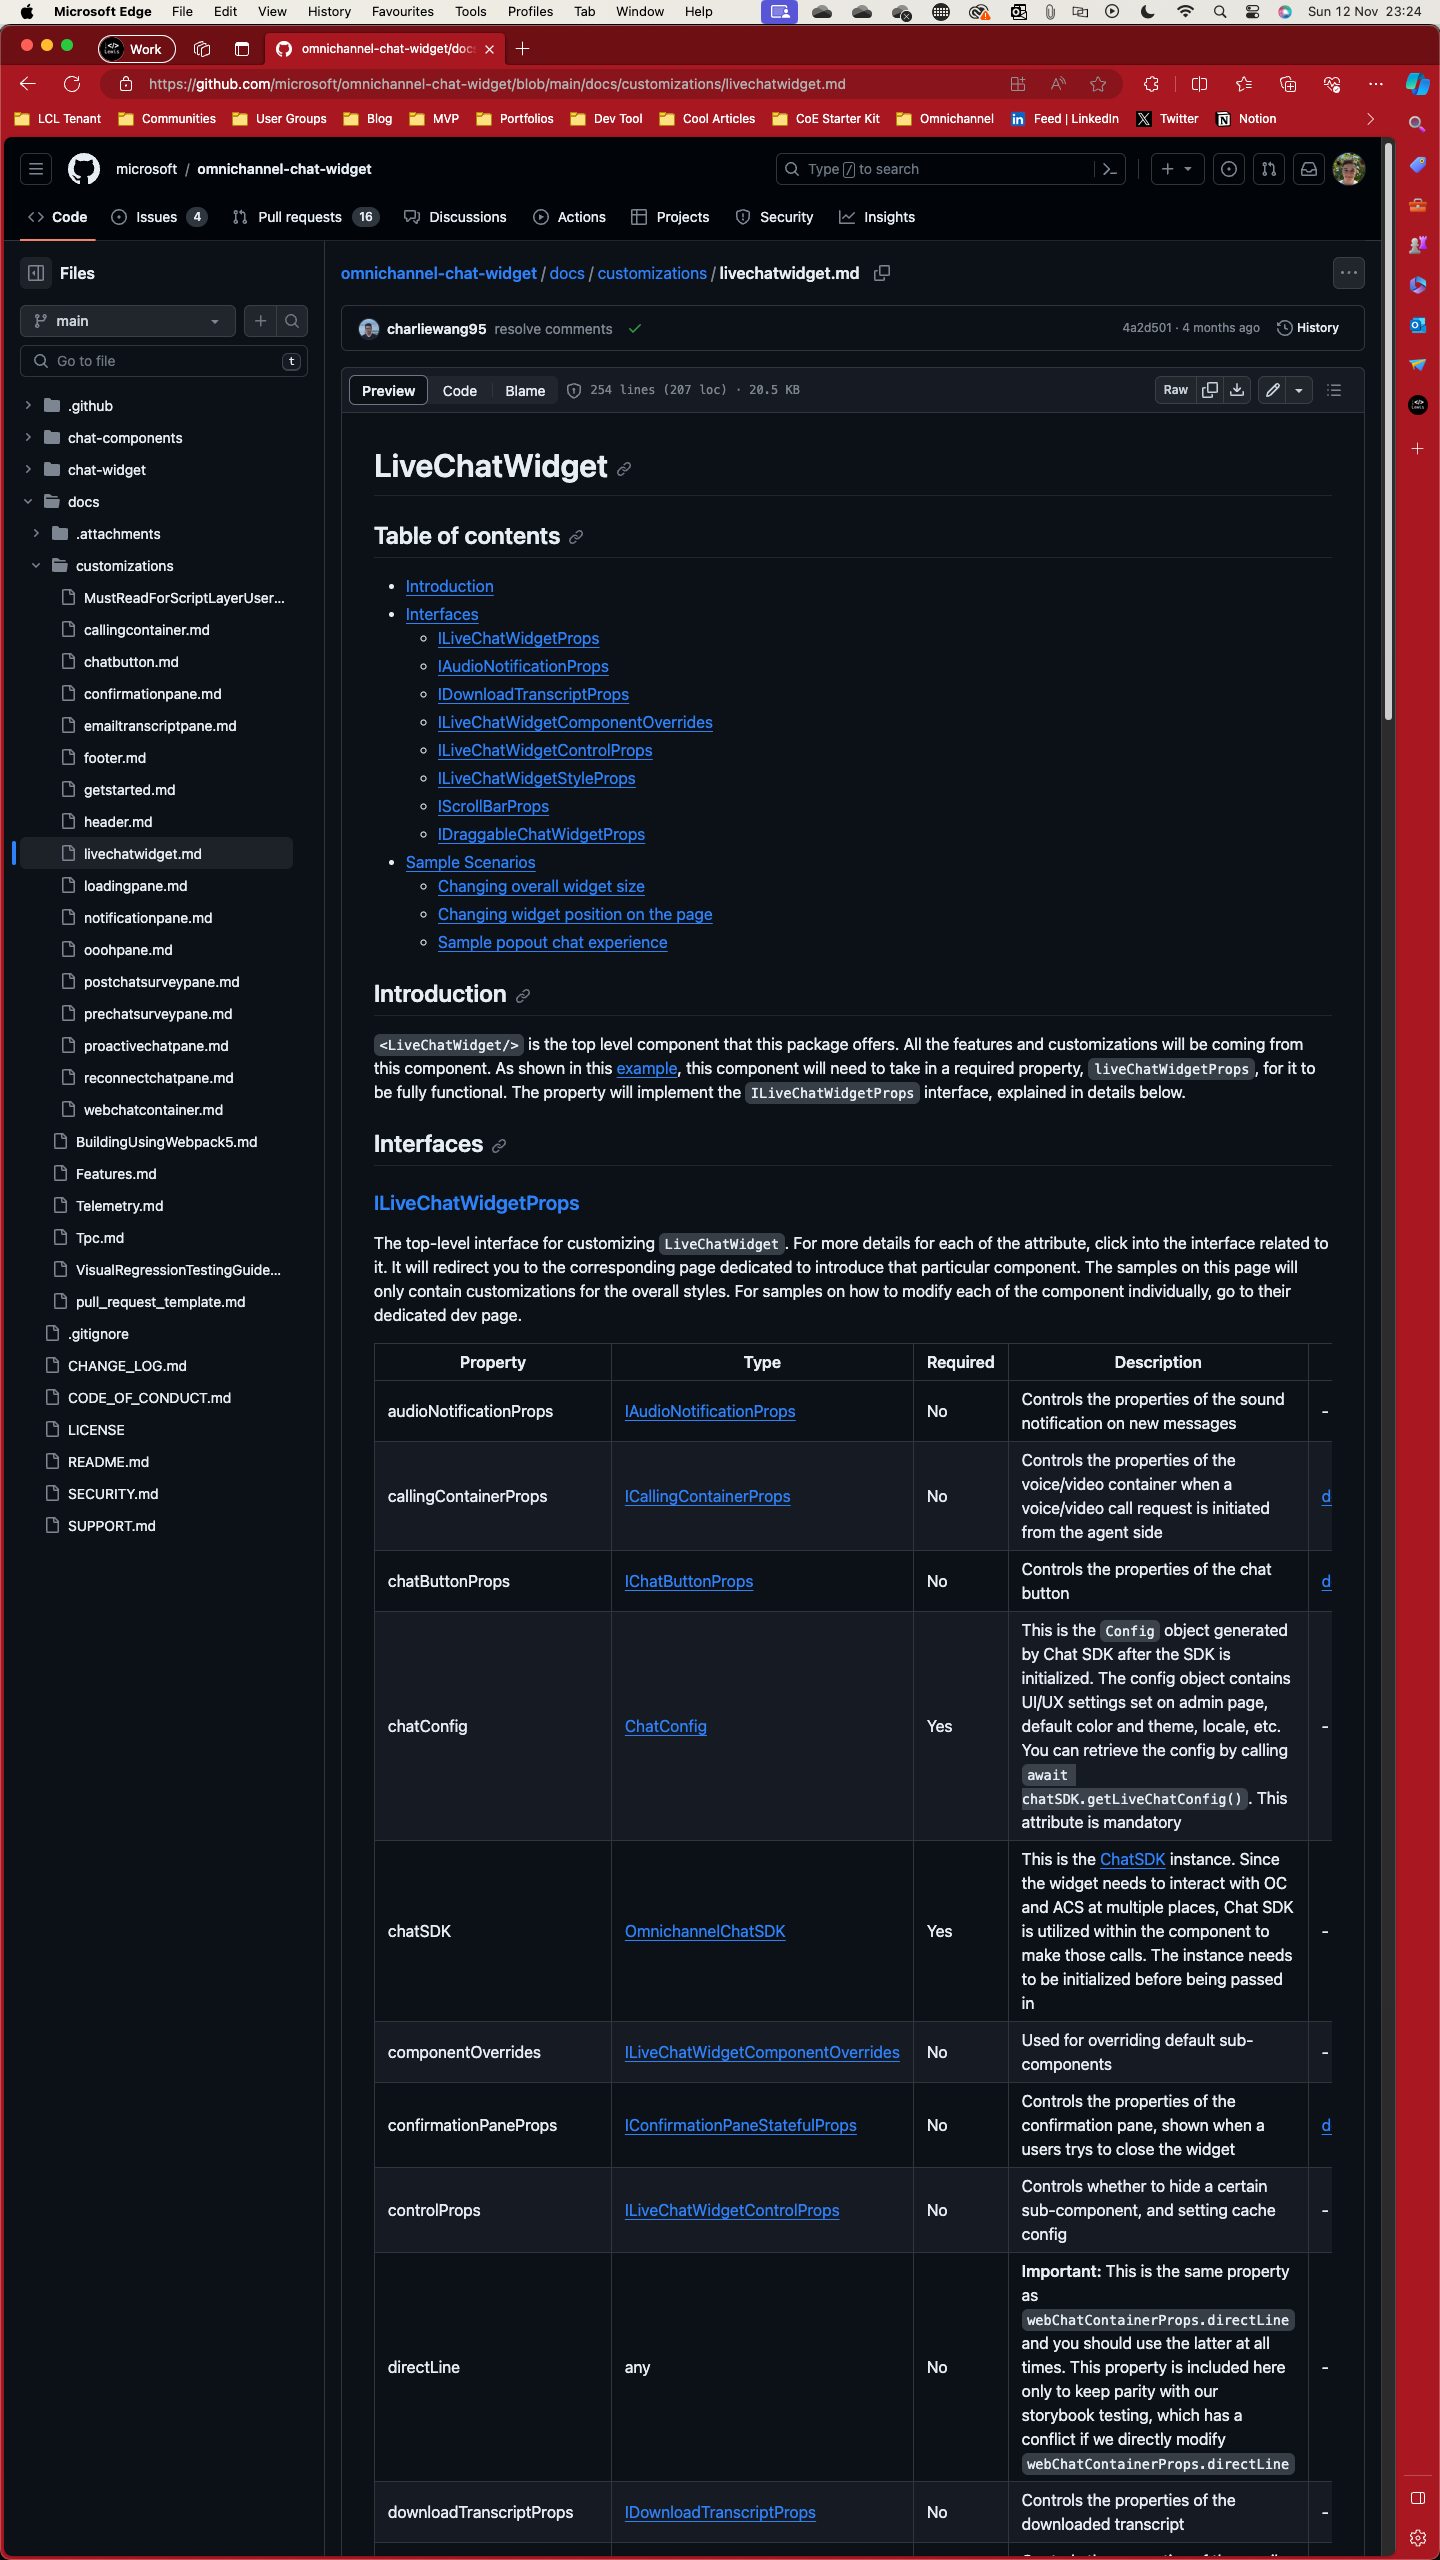
Now if you want to make changes to any of the chat widget properties here – omnichannel-chat-widget/docs/customizations/getstarted.md at main · microsoft/omnichannel-chat-widget (github.com), you can do this in the index.tsx file.
In the documentation above, you’ll find the various properties for styling and functional elements within the link to each UI component.
Let me know what changes you need to make to the chat widget to achieve your requirements, whether they just be styling, or more functional requirements! 👀 💖
Did you like this content? 💖
Did you like this content? Check out some of the other posts on my blog, and if you like those too, be sure to subscribe to get my posts directly in your inbox for free!
Subscribe