

Do you like the data-driven type format of a model-driven app but feel like you don’t have enough flexibility with regard to customisation and being able to build custom functionality to meet your requirements? Perhaps you want to build some kind of toolbox that your users can use to take action on a selected record? 🤔
In this blog post, I’ll share how you can launch a canvas app in a pop-up by selecting a custom ribbon button where we can also pass values into our app using parameters to then surface records, or data passed from our model-driven app.
Building a canvas app
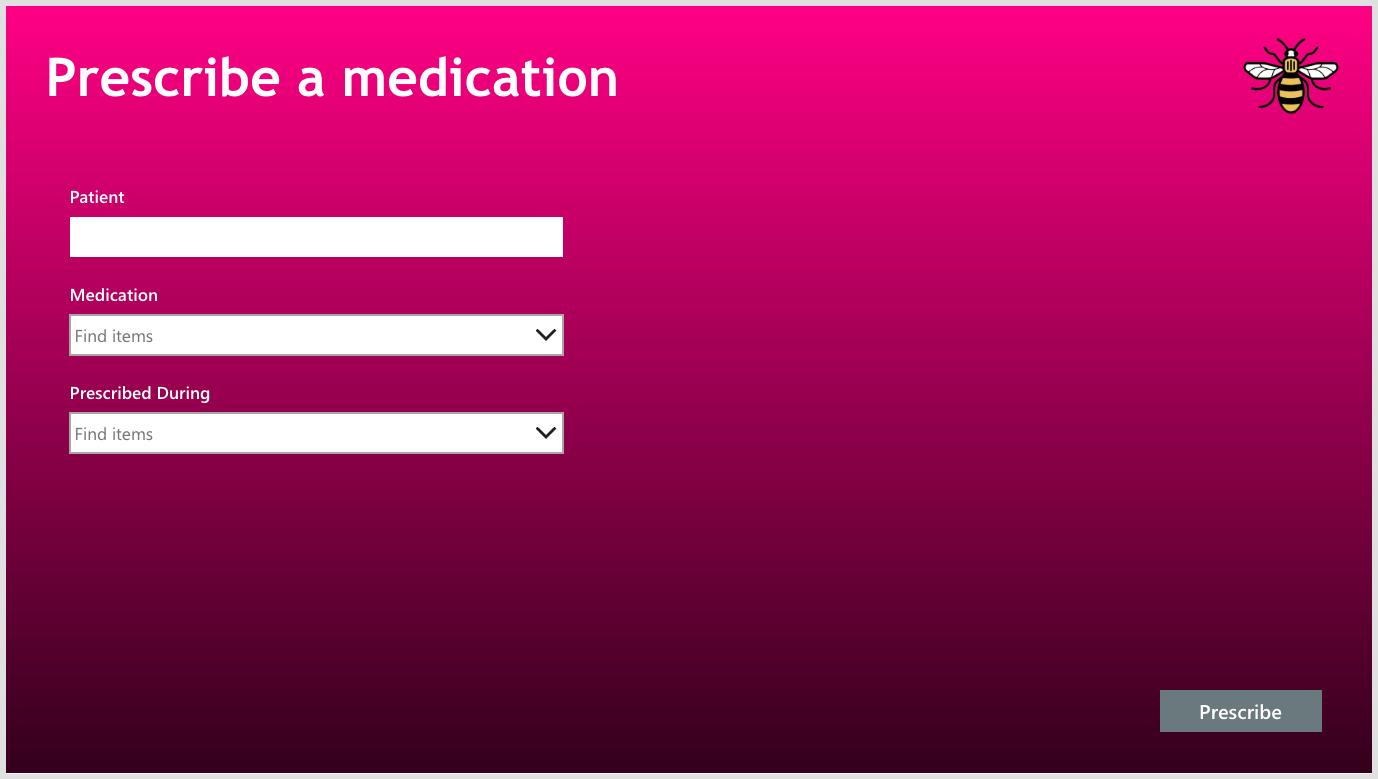
Let’s start by taking a look at a canvas app I want to use as a popup in my checkups model-driven app to be able to prescribe my patients with medication. Here I’m going to need to be able to launch a pop up which will be this canvas app, pass in a contact (patient) record GUID and then handle that in my app.
I’ve built out a simple UI in my app with a gradient background, Manchester Bee for the Manchester Bee Doctors Surgery, a form to prescribe medication using, and a title.
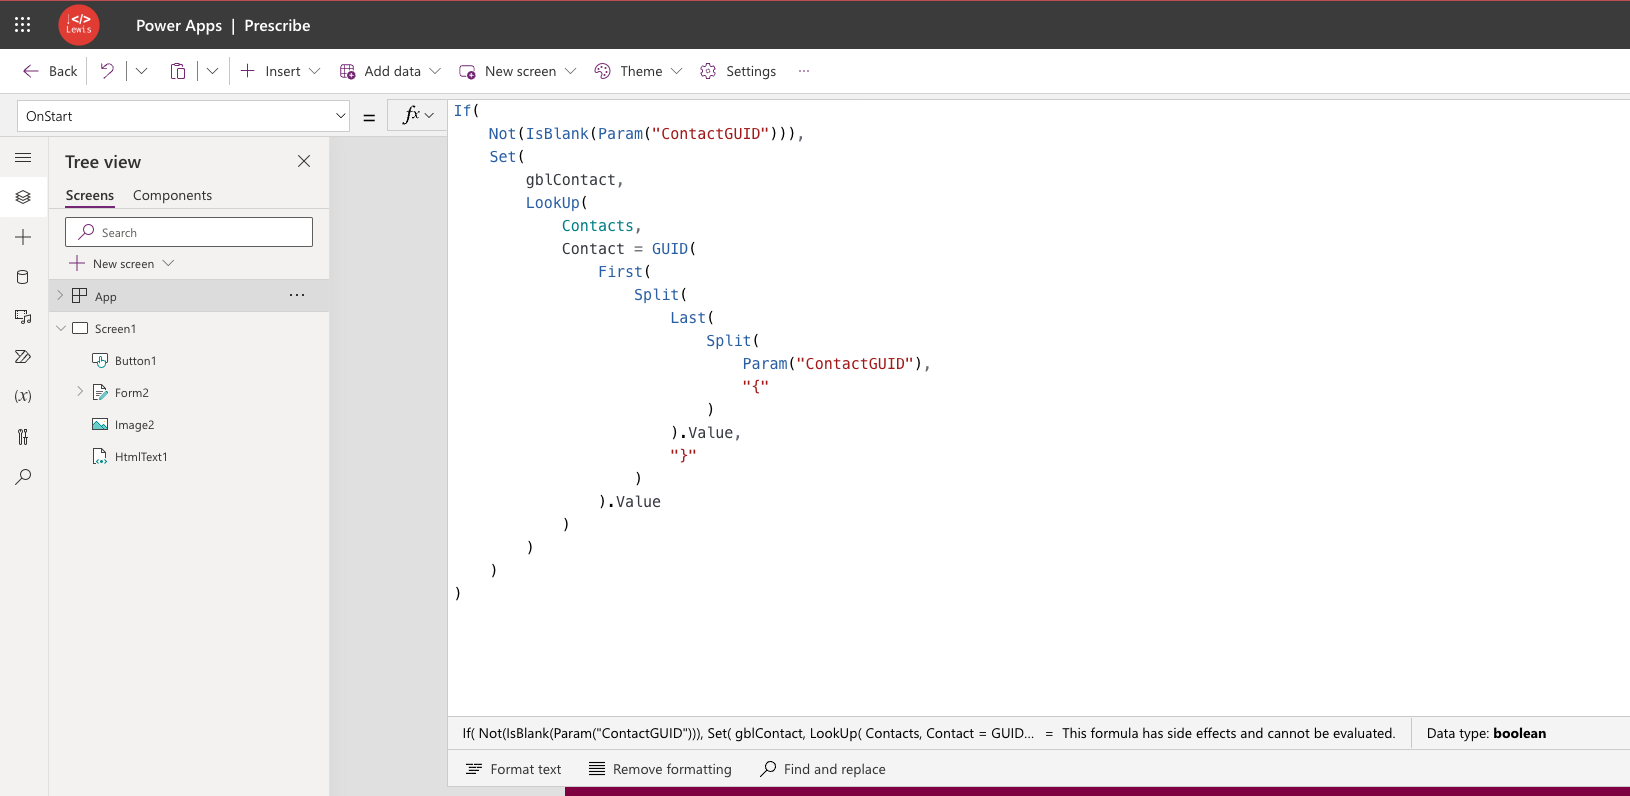
On my form, I need the contact field to stay view only and populate automatically with the patient I selected in my model driven app. First let’s take a look at some code in my OnStart property to handle a URL parameter value which is how I’ll pass in my contact GUID.
If(
    Not(IsBlank(Param("ContactGUID"))),
    Set(
        gblContact,
        LookUp(
            Contacts,
            Contact = GUID(
                First(
                    Split(
                        Last(
                            Split(
                                Param("ContactGUID"),
                                "{"
                            )
                        ).Value,
                        "}"
                    )
                ).Value
            )
        )
    )
)
So, you may notice I have a bit more going on here than if I was to handle a GUID for something like deep linking. With the way we will get hold of our selected record GUID from our model-driven app, we end up with curly braces wrapped around the GUID. We need to select the GUID directly out of these braces and so we will use two Split() functions to do this, first we take the second part of the GUID leaving the end curly brace, and then we wrap another Split() around that to take the first part, removing the end curly brace.
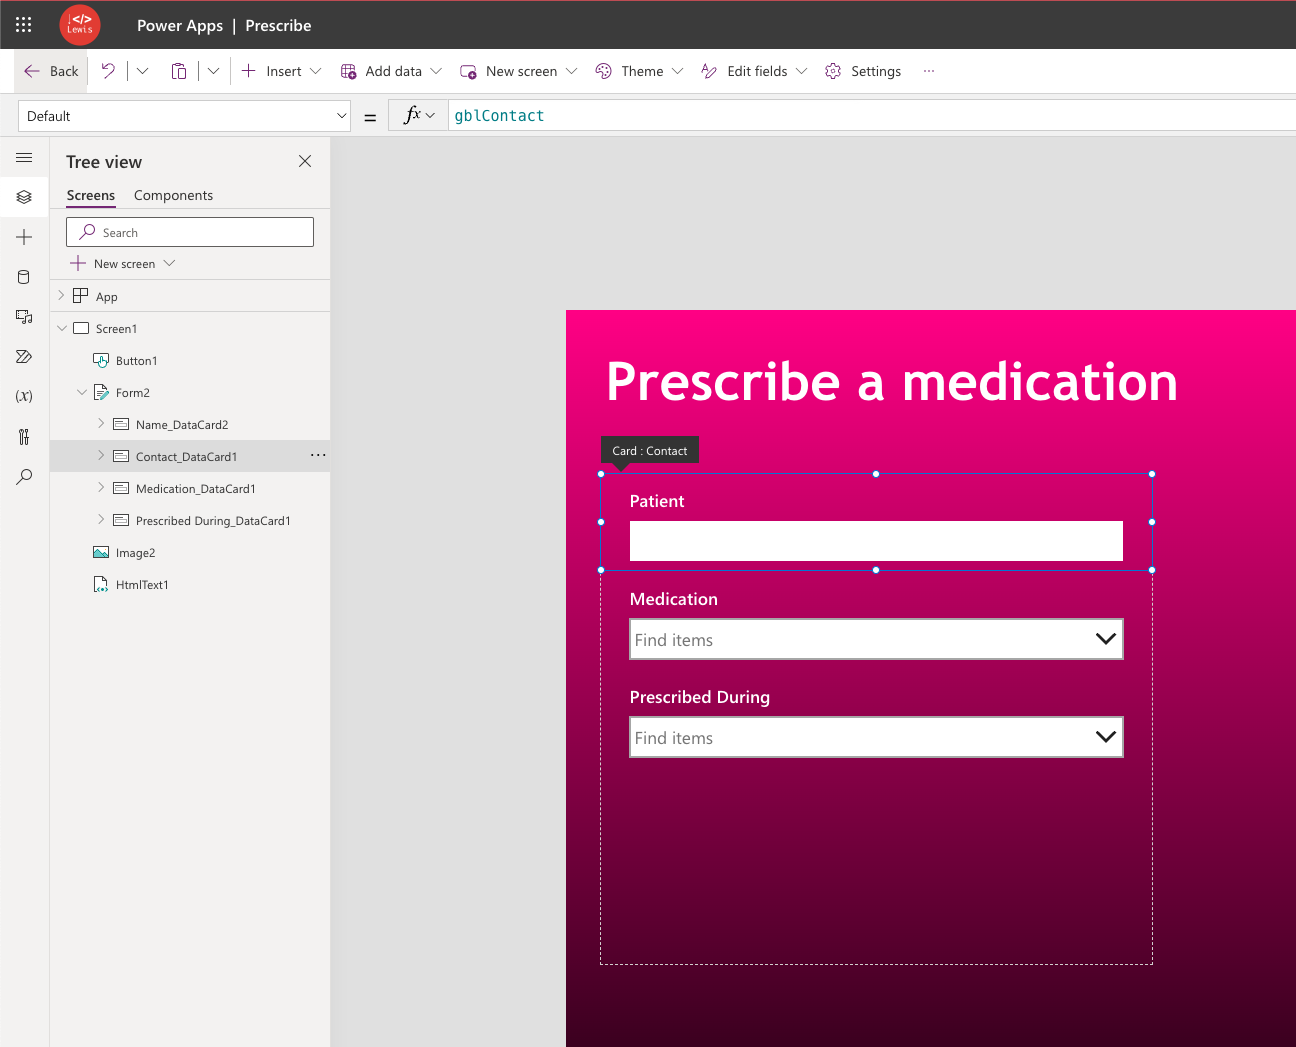
Now you can see in my new record form, I have my patient (contact) field’s default property set to the variable I set in my OnStart. This is the default property on the data card not the combobox.
On that note, I’ve got a canvas app ready for my requirements! We’ve so far focused on how to handle a GUID that gets passed in from your model-driven app. You can adjust the functionality in your canvas app to support what you want to do in it.
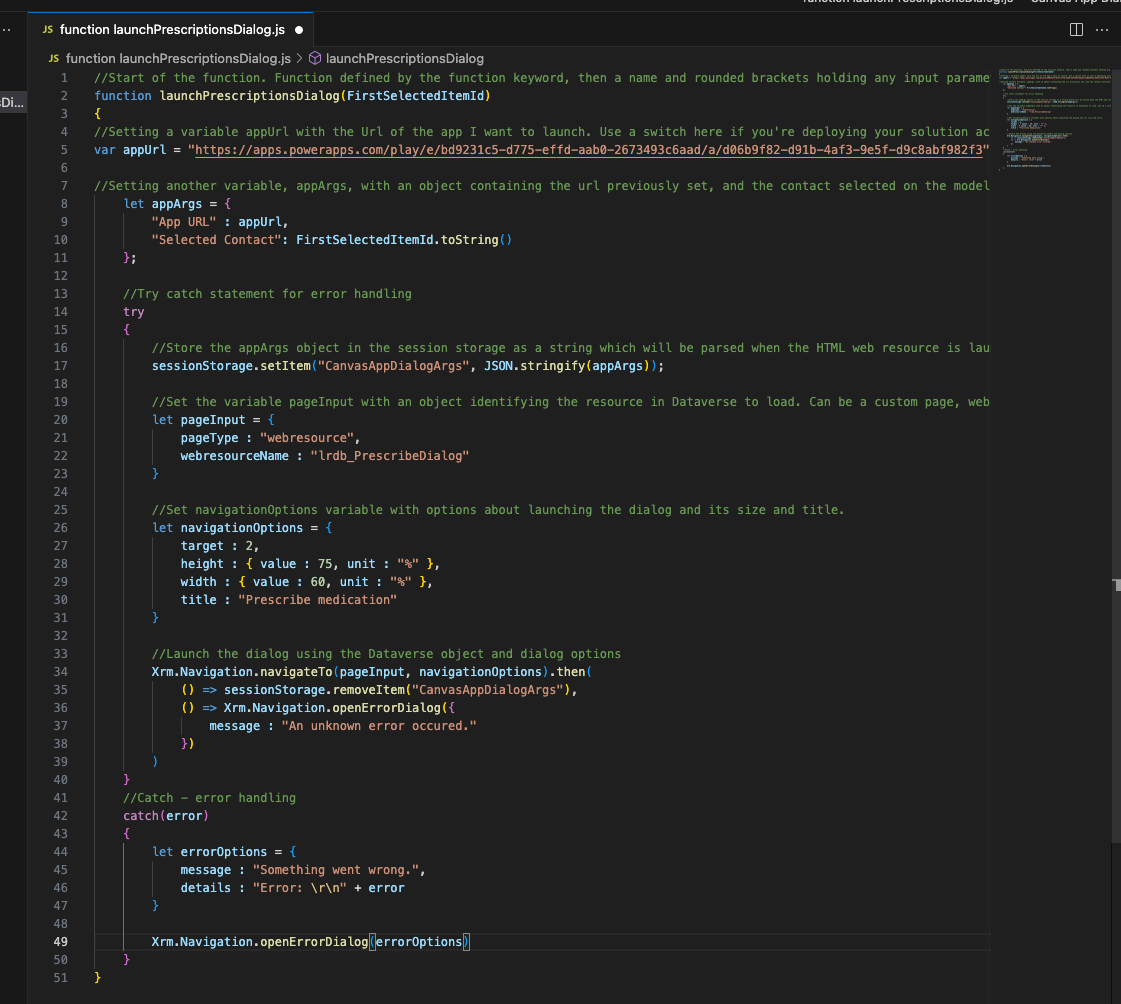
Writing a JavaScript function to launch a dialog
Now, in a few moments we’ll edit the ribbon in a model-driven app so that when we select it, we have our canvas app pop up launched. To make this possible, we need to write a JavaScript function to do it!
//Start of the function. Function defined by the function keyword, then a name and rounded brackets holding any input parameters to be used in the function.
function launchPrescriptionsDialog(FirstSelectedItemId)
{
//Setting a variable appUrl with the Url of the app I want to launch. Use a switch here if you're deploying your solution across environments.
var appUrl = "APP URL GOES HERE"

//Setting another variable, appArgs, with an object containing the url previously set, and the contact selected on the model driven app view which has been passed in as a parameter from Power Apps.
    let appArgs = {
        "App URL" : appUrl,
        "Selected Contact": FirstSelectedItemId.toString()
    };

    //Try catch statement for error handling
    try
    {
        //Store the appArgs object in the session storage as a string which will be parsed when the HTML web resource is launched.
        sessionStorage.setItem("CanvasAppDialogArgs", JSON.stringify(appArgs));

        //Set the variable pageInput with an object identifying the resource in Dataverse to load. Can be a custom page, web resource etc.
        let pageInput = {
            pageType : "webresource",
            webresourceName : "lrdb_PrescribeDialog"
        }

        //Set navigationOptions variable with options about launching the dialog and its size and title.
        let navigationOptions = {
            target : 2,
            height : { value : 75, unit : "%" },
            width : { value : 60, unit : "%" },
            title : "Prescribe medication"
        }

        //Launch the dialog using the Dataverse object and dialog options
        Xrm.Navigation.navigateTo(pageInput, navigationOptions).then(
            () => sessionStorage.removeItem("CanvasAppDialogArgs"),
            () => Xrm.Navigation.openErrorDialog({
                message : "An unknown error occured."
            })
        )
    }
    //Catch - error handling
    catch(error)
    {
        let errorOptions = {
            message : "Something went wrong.",
            details : "Error: \r\n" + error
        }

        Xrm.Navigation.openErrorDialog(errorOptions)
    }
}
Check out the comments in the function above to understand what we’re going here. You can see we at some point in the code launch a dialog which is populated using a web resource from Dataverse. This web resource is going to hold a dynamic url / our canvas app which is based on what we push towards it using our session storage. Now let’s take a look at our web resource.
Creating a web resource to populate the dialog with
So, in our JavaScript which will be run on the selection of a ribbon button we’re launching a dialog which gets populated with a web resource from Dataverse. In that web resource we need to populate an IFRAME with the url we have pushed towards our web resource from our JavaScript run on the selection of our button, using our session storage.
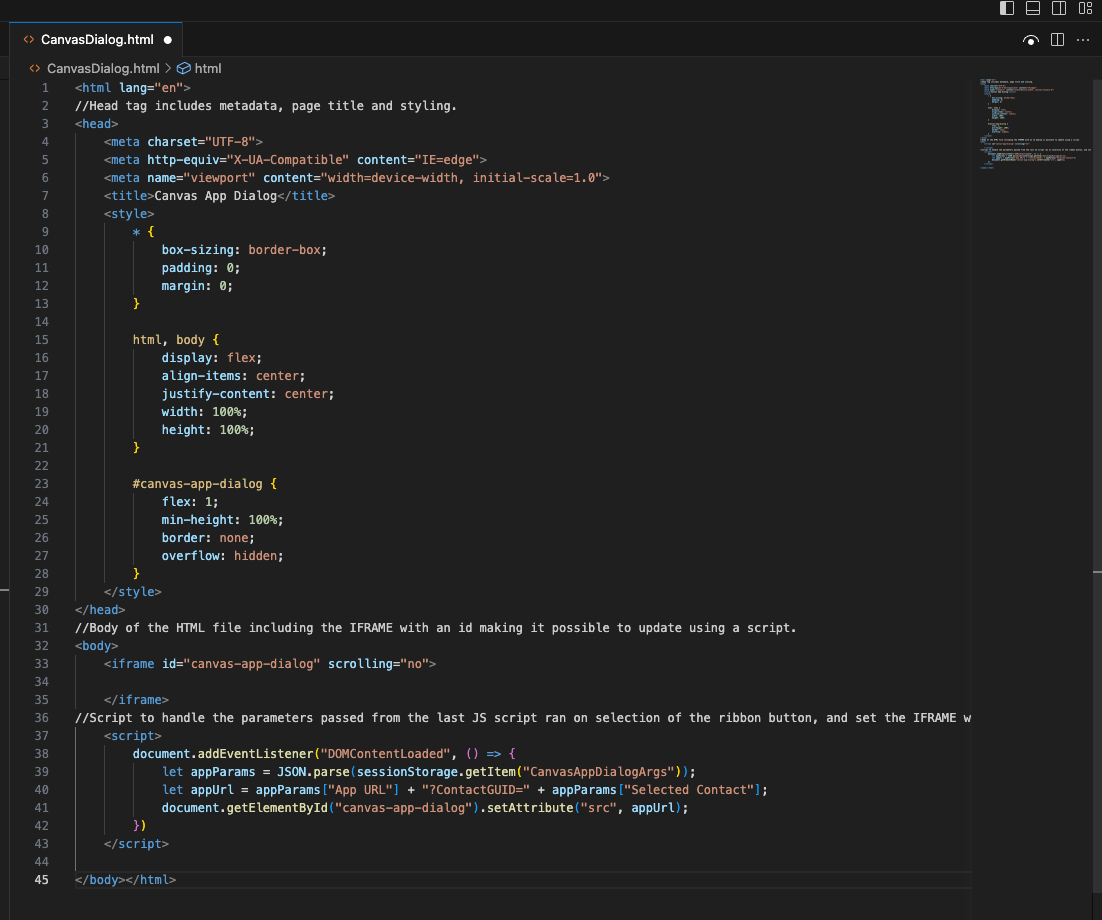
Here’s the web resource code I’m using. Play close attention to the comments to understand what the code is doing.
<html lang="en">
//Head tag includes metadata, page title and styling.
<head>
    <meta charset="UTF-8">
    <meta http-equiv="X-UA-Compatible" content="IE=edge">
    <meta name="viewport" content="width=device-width, initial-scale=1.0">
    <title>Canvas App Dialog</title>
    <style>
        * {
            box-sizing: border-box;
            padding: 0;
            margin: 0;
        }

        html, body {
            display: flex;
            align-items: center;
            justify-content: center;
            width: 100%;
            height: 100%;
        }

        #canvas-app-dialog {
            flex: 1;
            min-height: 100%;
            border: none;
            overflow: hidden;
        }
    </style>
</head>
//Body of the HTML file including the IFRAME with an id making it possible to update using a script.
<body>
    <iframe id="canvas-app-dialog" scrolling="no">

    </iframe>
//Script to handle the parameters stored from the last JS script ran on selection of the ribbon button, and set the IFRAME with the content once the file has loaded.
    <script>
        document.addEventListener("DOMContentLoaded", () => {
            let appParams = JSON.parse(sessionStorage.getItem("CanvasAppDialogArgs"));
            let appUrl = appParams["App URL"] + "?ContactGUID=" + appParams["Selected Contact"];
            document.getElementById("canvas-app-dialog").setAttribute("src", appUrl);
        })
    </script>

</body></html>
Now with the web resource, we’ve got something that the button JS can launch. Then the web resource will run its own script once it has loaded, it will handle parameters from the session storage and then update the IFRAME in the HTML to display the canvas app for us.
Customisation on our model-driven app
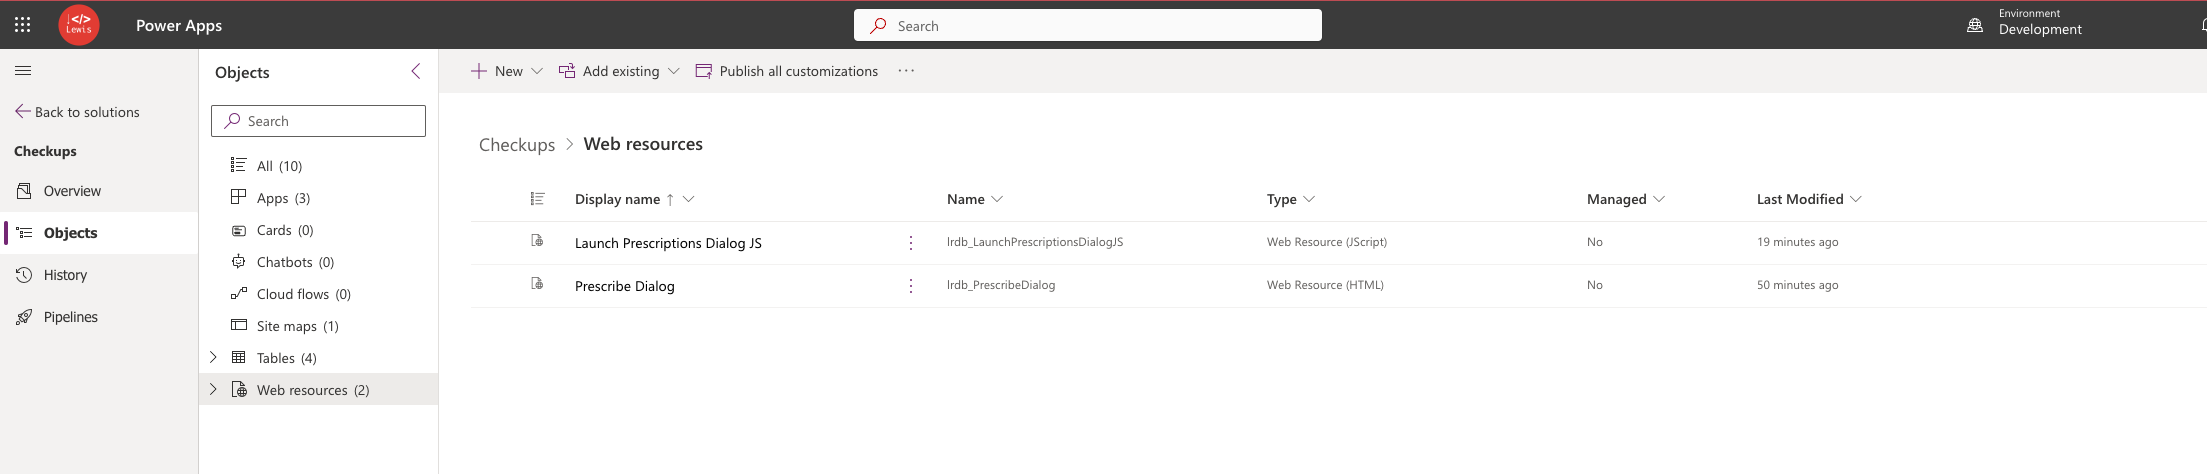
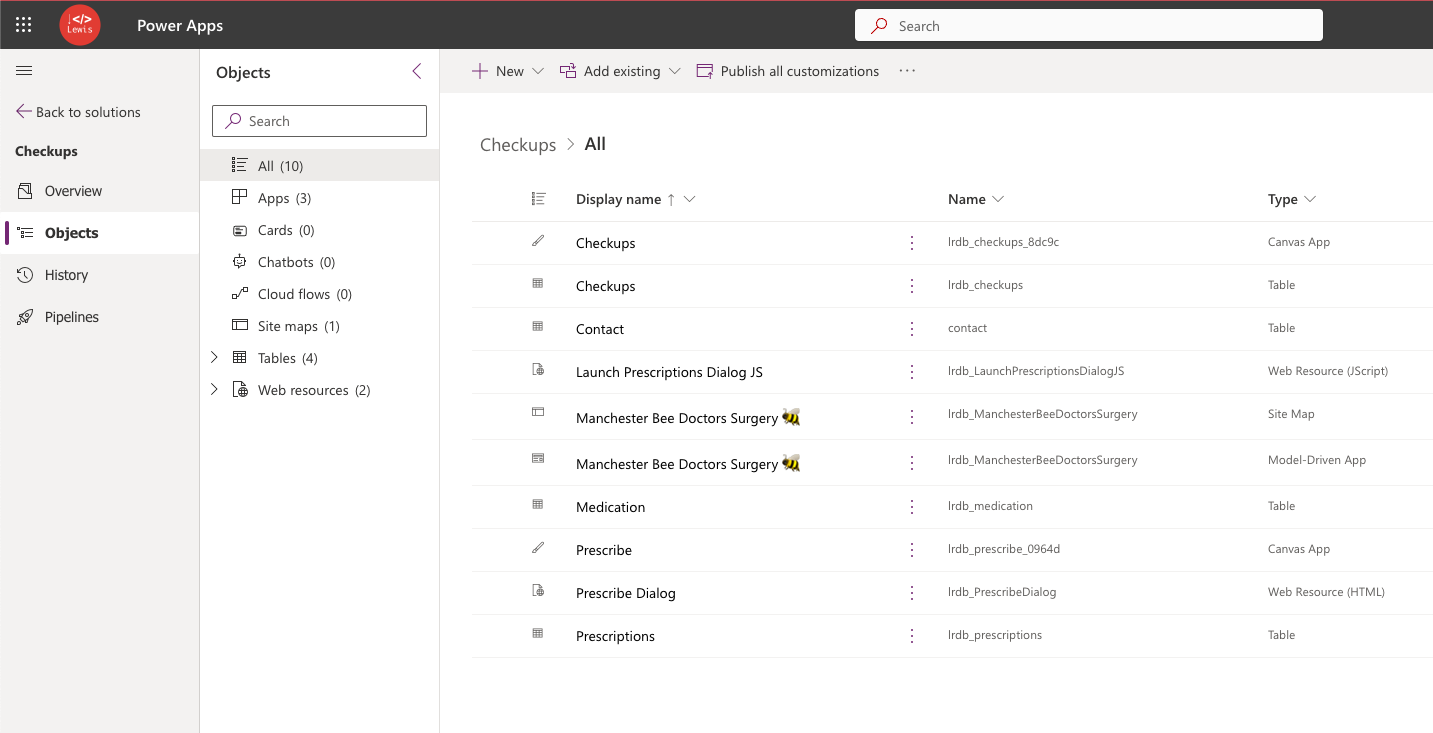
Now we need to do some customisation on our model-driven app to put the pieces together and get this to work. Start by adding the JavaScript file and HTML file to Dataverse in your solution as web resources.
Ensure that your HTML file web resources uses the name you’ve referenced in your JavaScript function.
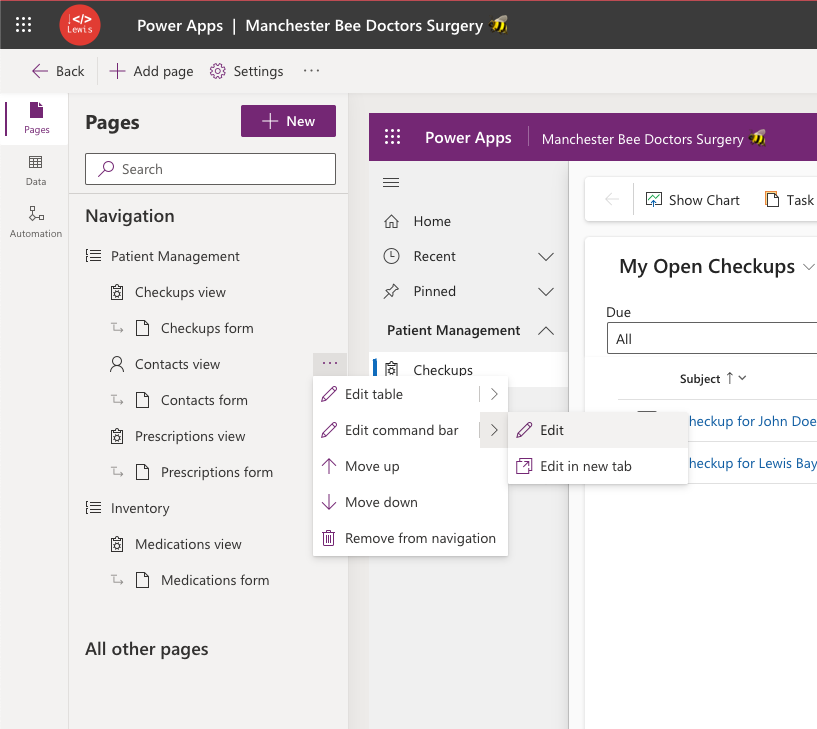
Now open the model-driven app you want to add your dialog to in edit mode. Then select to edit the command bar on the table you’re going to select a record for and pass that record’s GUID to your canvas app dialog.
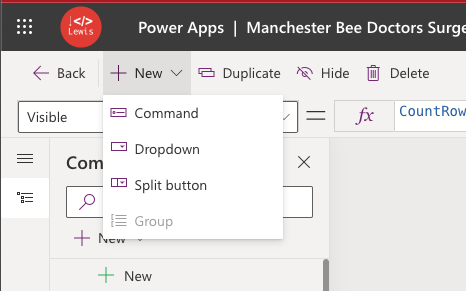
Now simply start by adding a command to the ribbon.
Now you’ll need to populate the command with a label and set the action to run JavaScript. Then select the JavaScript library you uploaded to Dataverse as a web resource and finally populate the name of the function that should be run.
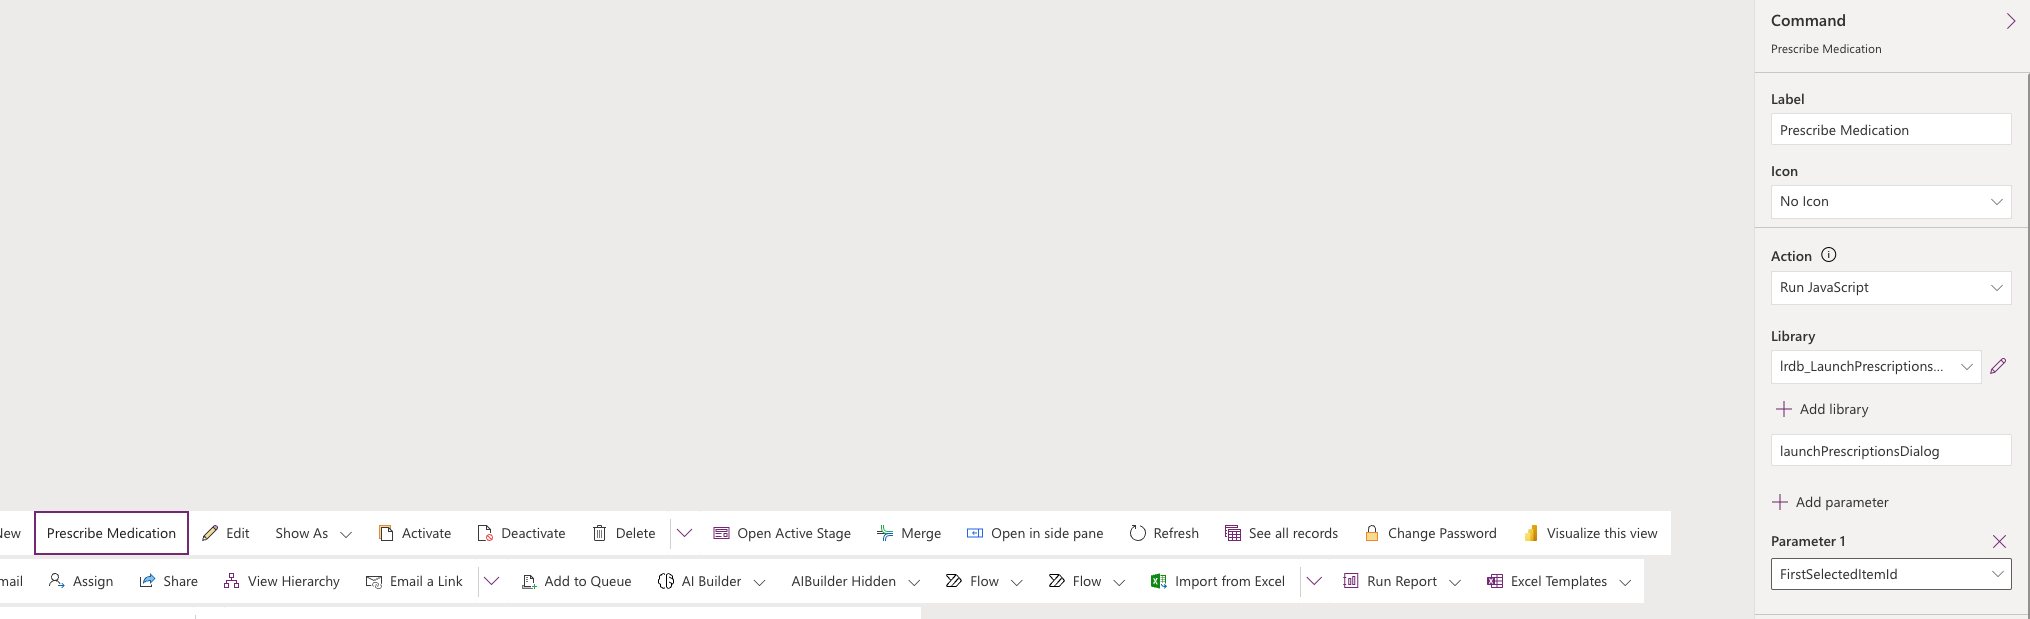
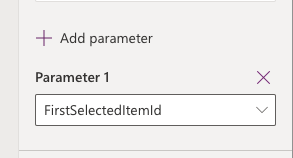
Now select add parameter and select the FirstSelectedItemId parameter we have the option to use.
Now we need to ensure that the button on the ribbon shows when a record is selected. Set the visibility option to show on condition from formula then select open formula bar.
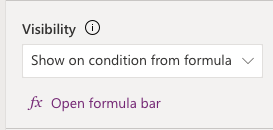
Now set the visibility property of the command to…
CountRows(Self.Selected.AllItems) =1Save and publish the command bar, and head back to your solution. Publish all customisations.
Testing it out
Now let’s test things out! Simply open your model-driven app and head to the table you’ve applied a dialog to, which in my case is my contacts table. Select a record and select your custom command on the ribbon.
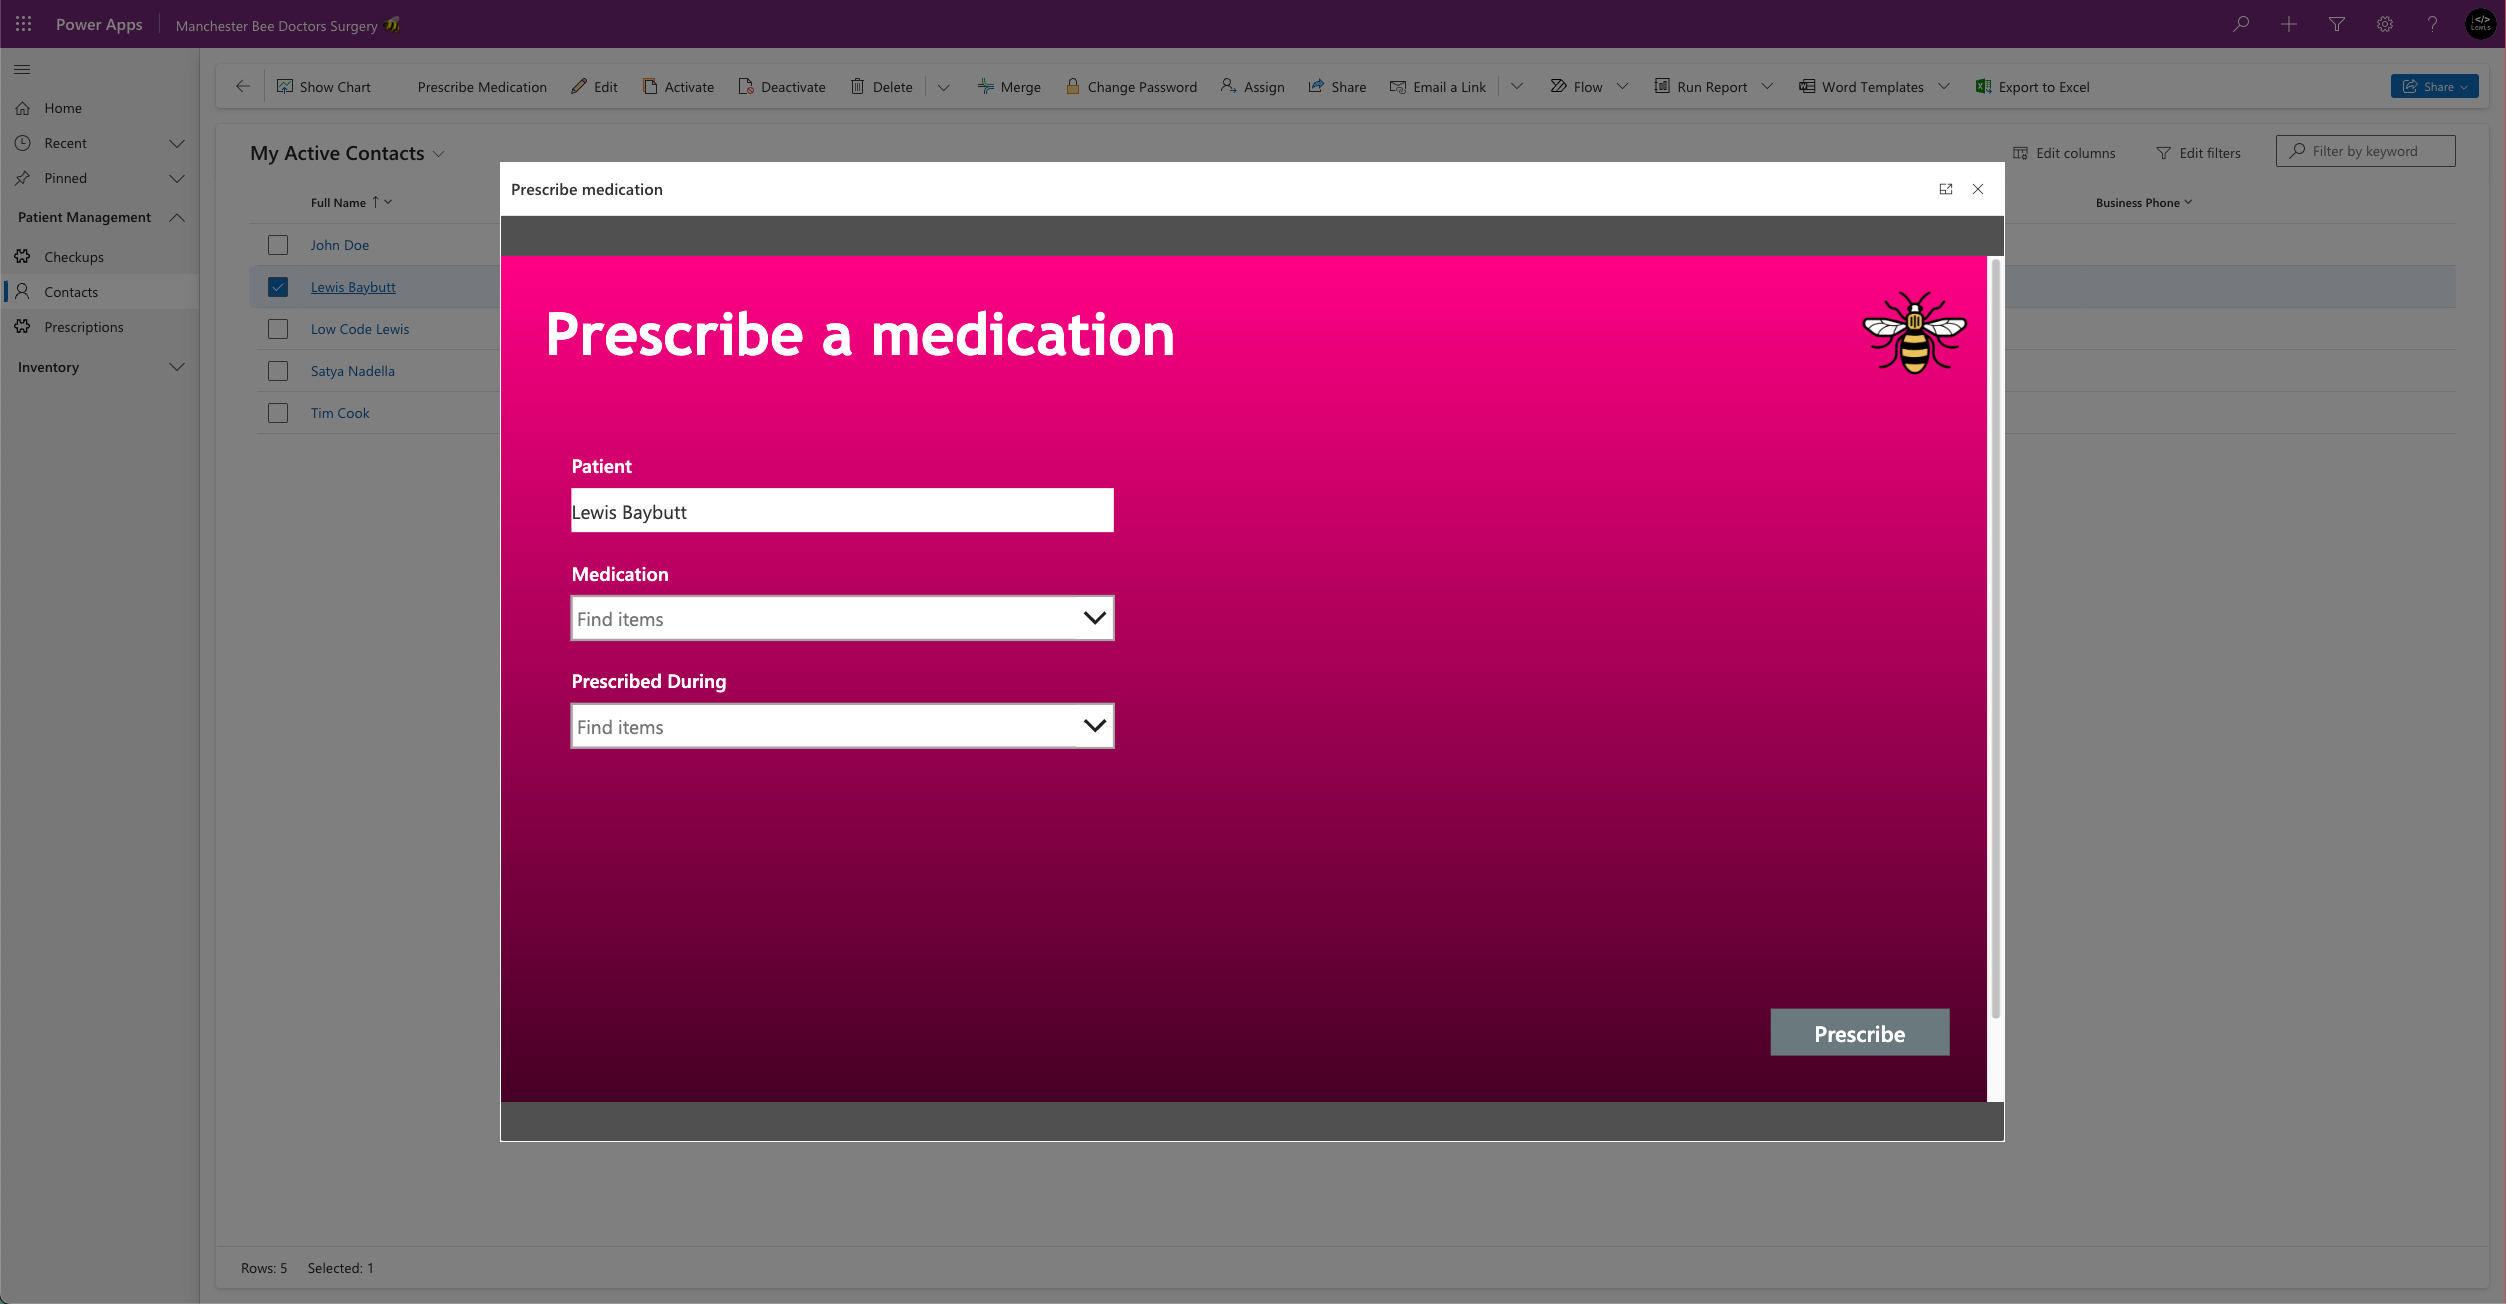
And there we go! Canvas Apps as pop ups in model-driven apps!
Try it with custom pages
It’s also possible to use potentially more simple custom pages for this. Check out my community friend, Matthew Devaney’s work to find out how!
Did you enjoy this content? 💖
Enjoyed this post and found it helpful? Check out some of the other content on my site and if you like those posts too, subscribe to get my articles delivered directly to your inbox for free!
Subscribe